As AI technology continues to evolve, more businesses are relying on intelligent assistants to improve productivity and streamline daily workflows. UCloud has taken the lead by launching a one-click deployment image for Clawdbot, with seamless integration support for WeCom and Feishu, allowing users to quickly build their own private AI assistant on these popular enterprise communication platforms.
1. Clawdbot One-Click Deployment Solution: Easily Build Your Personal AI Assistant
UCloud recently released a ready-to-use Clawdbot image that can be deployed with minimal effort. Users can build a fully functional private AI assistant in approximately 10 minutes. Below are the key deployment steps for Clawdbot:
- Clawdbot Installation: Complete in 3 Steps
Follow the official UCloud documentation step by step to ensure the Clawdbot service runs properly after deployment.
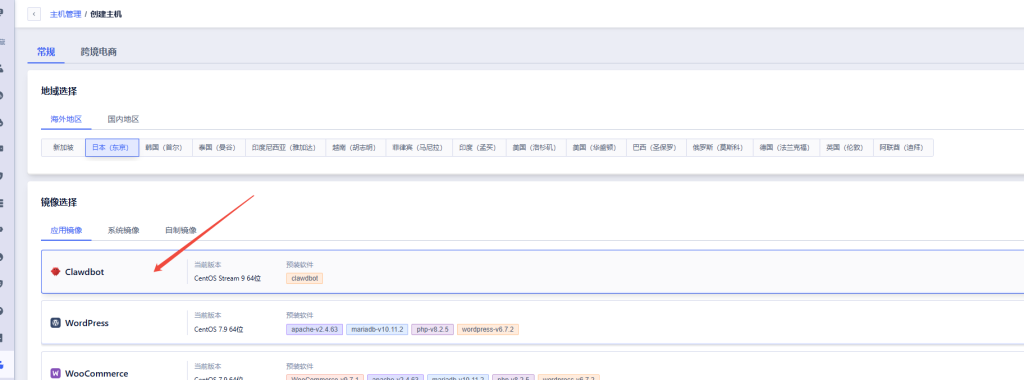
Reference article: UCloud International Launches Clawdbot Image: The Globally Popular “24/7 Personal AI Super Assistant” - Create a UCloud Lightweight Cloud Server
UCloud Lightweight Cloud Server Portal:
https://console.ucloud.cn/light-server/create/Select the United States, Singapore, or Japan region, choose the CentOS operating system, and locate the corresponding Clawdbot image. - Create a UCloud Elastic Cloud Server
UCloud UHost Creation Portal:
https://console.ucloud.cn/uhost/uhost - Integrate WeCom or Feishu
Configure API message reception using WeCom or Feishu plugins to ensure seamless communication between your AI assistant and enterprise messaging platform. - Install and Enable Plugins
Install the corresponding WeCom or Feishu plugin, then configure the required API Tokens and secret keys. - Configure Services
Set up the Clawdbot gateway, ports, and server address to ensure stable communication with WeCom or Feishu.
2. Integrating Clawdbot with WeCom
During the integration process, four key configuration items will be generated:
- Token
- EncodingAESKey
- corpid
- corpsecret
The Token and EncodingAESKey can be manually configured or randomly generated while setting up the message receiving server.
The corpid and corpsecret are provided by WeCom officially. Please request them from your WeCom administrator. You can verify the credentials through the official WeCom Developer Center.
You need:
- A dedicated application within WeCom
- A server to receive WeCom messages (the same server where Clawdbot is installed)
After configuration, the Token and EncodingAESKey will be generated.
Configure Clawdbot
# 1. Install Plugin
clawdbot plugins install @william.qian/simple-wecom

# 2. Enable Plugin
clawdbot plugins enable simple-wecom

# 3. Configure WeCom (Required)
clawdbot config set channels.simple-wecom.corpid "ww1234567890abcdef"
clawdbot config set channels.simple-wecom.corpsecret "your-corp-secret"
clawdbot config set channels.simple-wecom.token "your-token"
clawdbot config set channels.simple-wecom.encodingAESKey "your-aes-key"
clawdbot config set channels.simple-wecom.enabled true

# 4. Configure Gateway
clawdbot config set gateway.mode "local"
clawdbot config set gateway.bind "0.0.0.0"
clawdbot config set gateway.port 18789

# 5. Restart Gateway
clawdbot gateway restart

# 6. Verify Status
clawdbot channels status
Getting Started
Once configuration is complete, you can directly chat with the AI assistant through your dedicated WeCom application and use it as your intelligent work assistant.
Feature Expansion
Clawdbot supports Skills. By default, it already includes 50 commonly used skills. Some functions, such as web search, require API keys. Users can also download or create additional skills such as OCR, format conversion, data processing, and more, continuously expanding the capabilities of their private AI assistant.
3. Integrating Clawdbot with Feishu
Install the Feishu Plugin (Feishu Channel)
Clawdbot does not include a built-in Feishu channel by default, so an additional plugin must be installed.
Originally, the plan was to let AI generate a plugin directly, but after searching, a community developer named @m1heng had already implemented and open-sourced a stable and reliable solution.
Project Repository:
https://github.com/m1heng/clawdbot-feishu
1. Install the Plugin
Run the following command on the server or container where Clawdbot is running:
clawdbot plugins install @m1heng-clawd/feishu
2. Configure Feishu Parameters
After installation, execute the following commands:
clawdbot config set channels.feishu.appId "cli_xxxxx"
clawdbot config set channels.feishu.appSecret "your_app_secret"
clawdbot config set channels.feishu.enabled true
Notes:
- appId and appSecret must be obtained from the Feishu developer console.
- The following steps explain how to create and configure a Feishu application.
Configure the Feishu Bot Application
1. Open the Feishu Developer Center
https://open.feishu.cn/app?lang=zh-CN
2. Create a Custom Enterprise Application
Path: Create Application → Enterprise Custom Application
Fill in the required information such as application name and description, then enter the application details page.
3. Configure Application Permissions
Go to Permission Management and add the permissions required by the plugin documentation.
Ensure that all permissions related to messaging, bots, and event subscriptions are enabled.
4. Configure Event Callback
Under Event Subscription / Callback Configuration, enable long connection callback reception.
Save the settings and verify that the callback validation succeeds.
5. Update Application Tokens
Return to the Credentials & Basic Information page and synchronize the App ID, App Secret, and Token to the corresponding Clawdbot configuration entries.
Getting Started
After completing the configuration, you can directly @mention the bot inside Feishu and use it as your intelligent assistant.
Scenario Example: OCR Recognition
Additional use cases include:
- Schedule management
- Time planning assistance
- Product price monitoring
- Stock price monitoring
4. Clawdbot Feature Expansion
Clawdbot not only supports WeCom and Feishu integration, but also includes 50 built-in AI skills such as:
- Web Search
- OCR Recognition
- Format Conversion
- Data Processing
Users can also download or customize additional skills based on their own needs, turning Clawdbot into a highly versatile private AI assistant.
5. Summary
UCloud’s Clawdbot image not only supports rapid deployment, but also provides seamless integration with WeCom and Feishu, enabling businesses to build efficient private AI assistants on widely used enterprise communication platforms.
With a simple configuration process, enterprises can quickly deploy a powerful AI assistant to improve workflow efficiency and automate daily operations. As AI technology continues to advance, Clawdbot is expected to further expand its capabilities and deliver even more intelligent services for businesses.
If you need assistance with deployment, please contact UCloud official customer support.