Want to build your own independent website on a VPS? Looking to quickly launch a blog or business website with WordPress? If you already have a BandwagonHost VPS, this tutorial will guide you step-by-step through the entire process — from purchasing the VPS and installing aaPanel to deploying a fully functional WordPress website. No coding experience required, making it perfect for beginners. By following this guide, you can have your website online within 30 minutes.
I. Preparation
Before getting started, please prepare the following:
- A working BandwagonHost VPS
- A domain name already pointed to your VPS IP address
- A little patience 😊
BandwagonHost offers multiple datacenter locations, including Los Angeles, New York, Singapore, and Hong Kong. For users in mainland China, the Los Angeles DC6/DC9 CN2 GIA route is highly recommended due to its lower latency and better network quality. This tutorial uses a BandwagonHost Los Angeles CN2 GIA VPS with the following specifications:
BandwagonHost CN2 GIA Optimized VPS Plan (Los Angeles)
Specifications:
- CPU: 2-Core Intel Xeon
- RAM: 1GB
- SSD: 20GB RAID-10
- Bandwidth Quota: 1000GB/month
- Port Speed: 2.5Gbps
- Virtualization: KVM (KiwiVM Panel)
- Operating Systems: CentOS, Debian, Ubuntu, RockyLinux, AlmaLinux
- IPv4: 1 Dedicated IP
- IPv6: /64 Subnet
- Access: Full Root Access
- Uptime Guarantee: 99.95%
Network Routing:
- Location: Los Angeles, USA (China Telecom IDC)
- Network: China Telecom CN2 GIA Premium Optimized Route
- China Unicom: 2.5Gbps Enterprise Dedicated Line
- Other Regions: Optimized E-commerce Network
- Direct Connectivity with Google
Additional Features:
- Free Automatic Backups
- Free Snapshots
- Automatic Datacenter Migration Support
- Instant rDNS Reverse DNS Modification
Price: $49.99/quarter, Purchase Link
Purchase Process Demonstration:
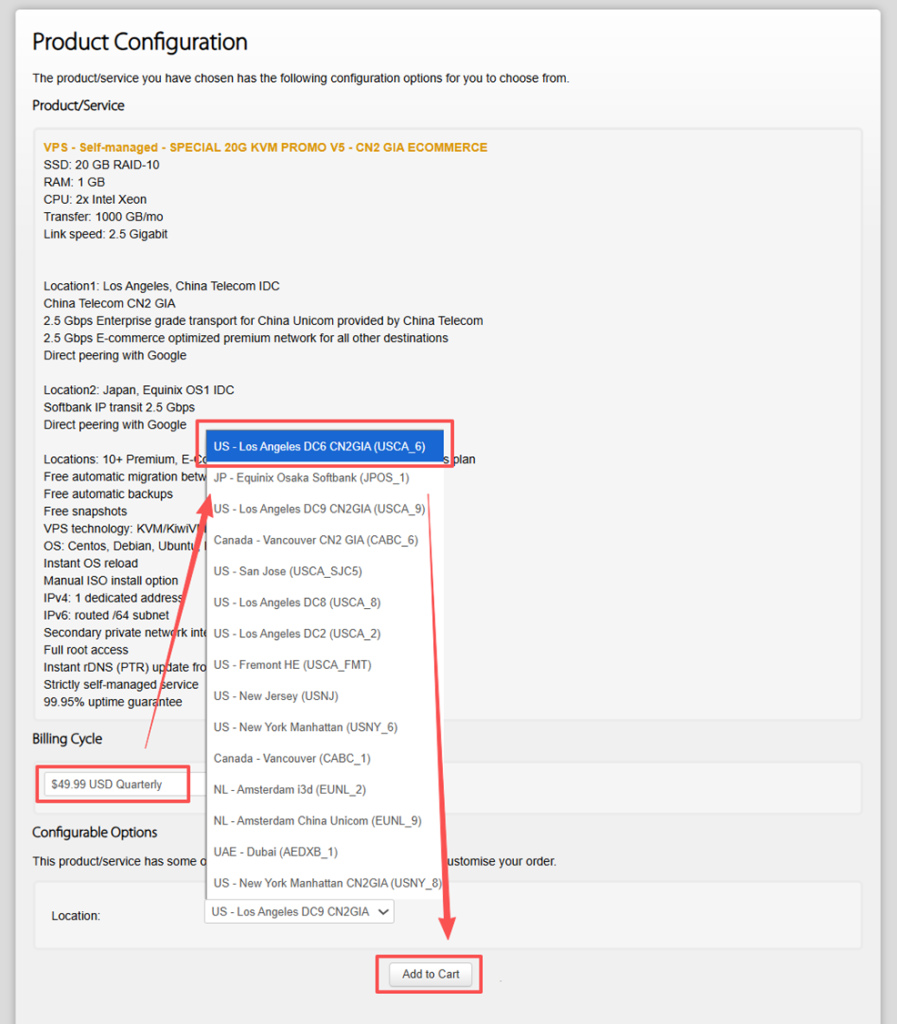
Click the purchase link above, select your billing cycle, choose the Los Angeles DC6 datacenter, then click the “Add to Cart” button:
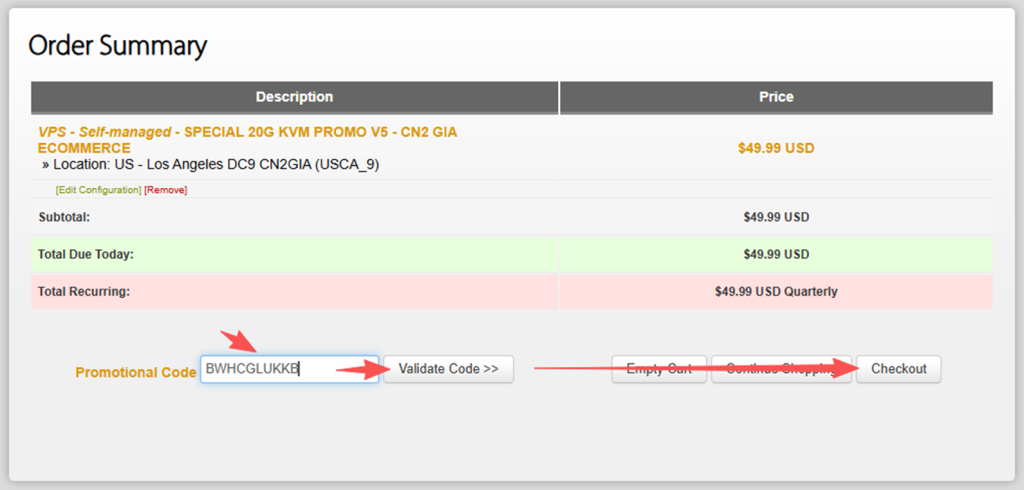
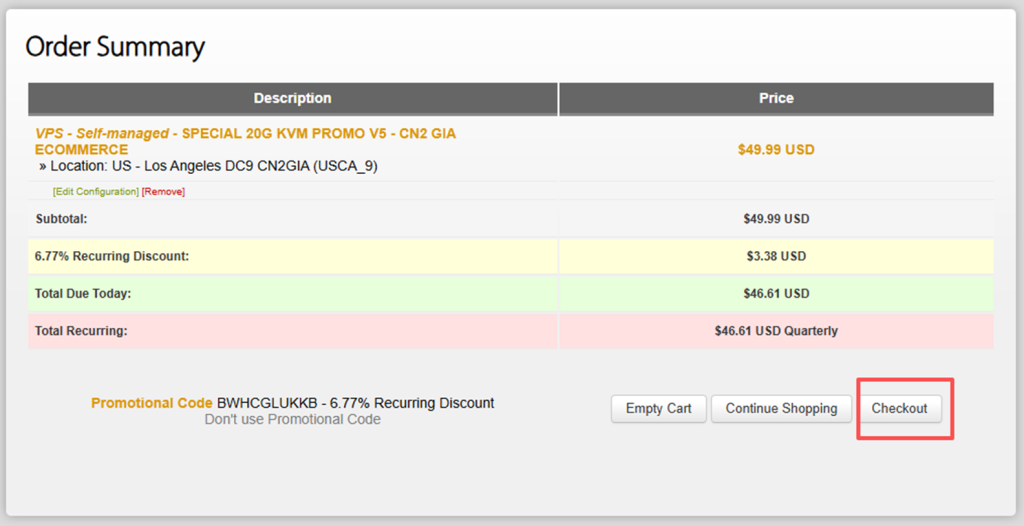
Enter the BandwagonHost coupon code: BWHCGLUKKB (6.77% discount), click “Validate Code,” then click “Checkout”:
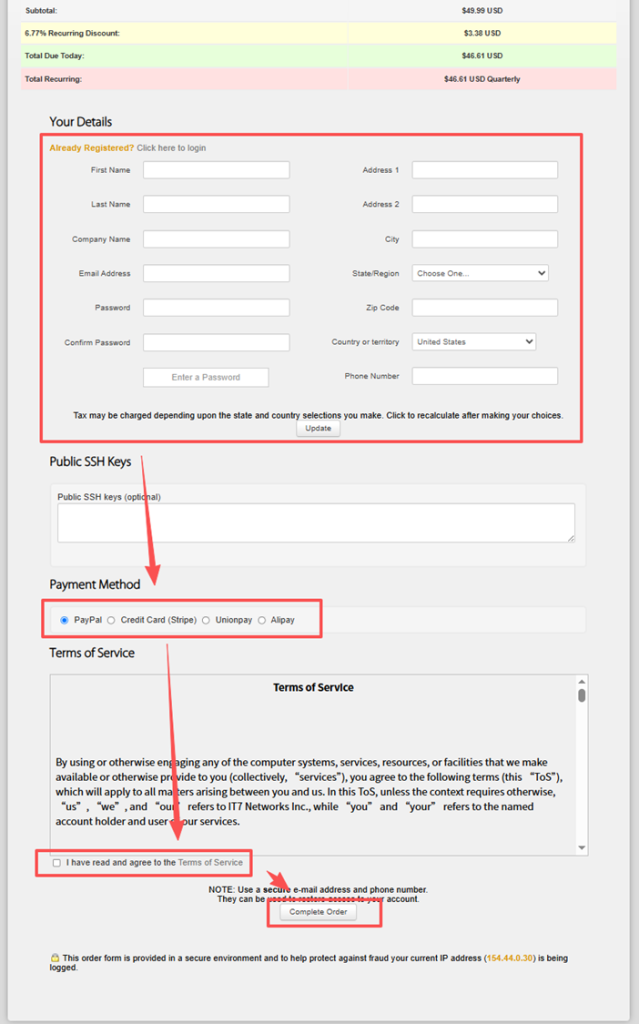
Fill in your account information and choose a payment method: Alipay, Credit Card (Stripe), UnionPay, etc. Agree to the Terms of Service and click “Complete Order” to proceed with payment:
II. Connect to Your BandwagonHost VPS via SSH
Log in to the BandwagonHost client area:
[https://bwh81.net/](https://bwh81.net/)
Go to “Services → My Services” and locate your VPS.
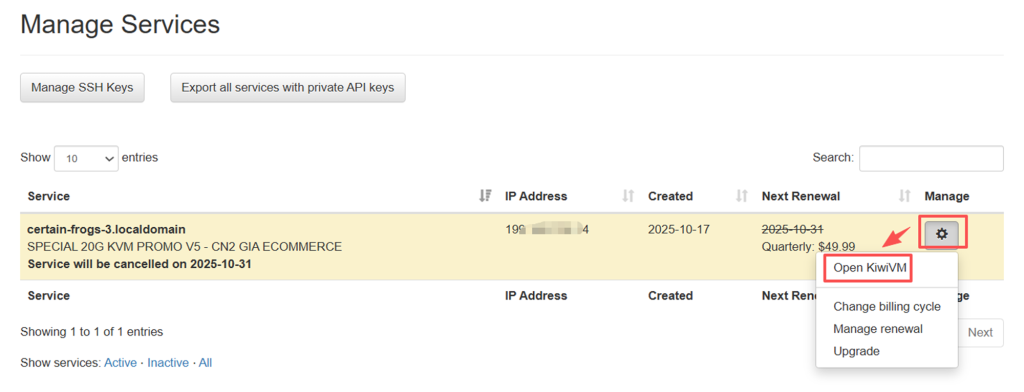
Click “KiwiVM Control Panel” to view your SSH login information, including:
- IP Address
- SSH Port (default: 22)
- Username: root
- Password: initial password or custom password
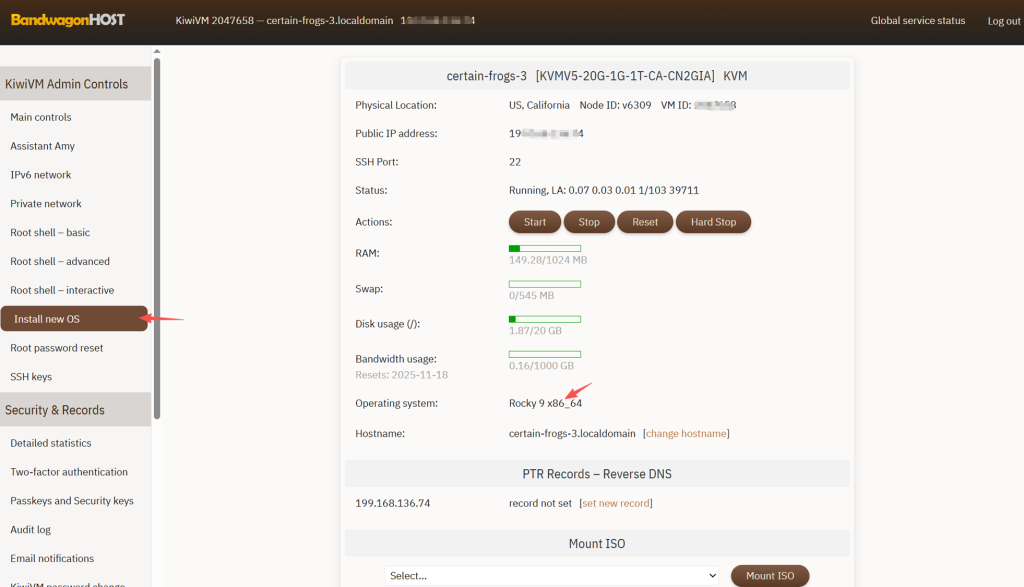
In this demonstration, the VPS system is reinstalled from Rocky Linux to Ubuntu.
Click “Install new OS,” select Ubuntu 22.04, then click “Reload”:
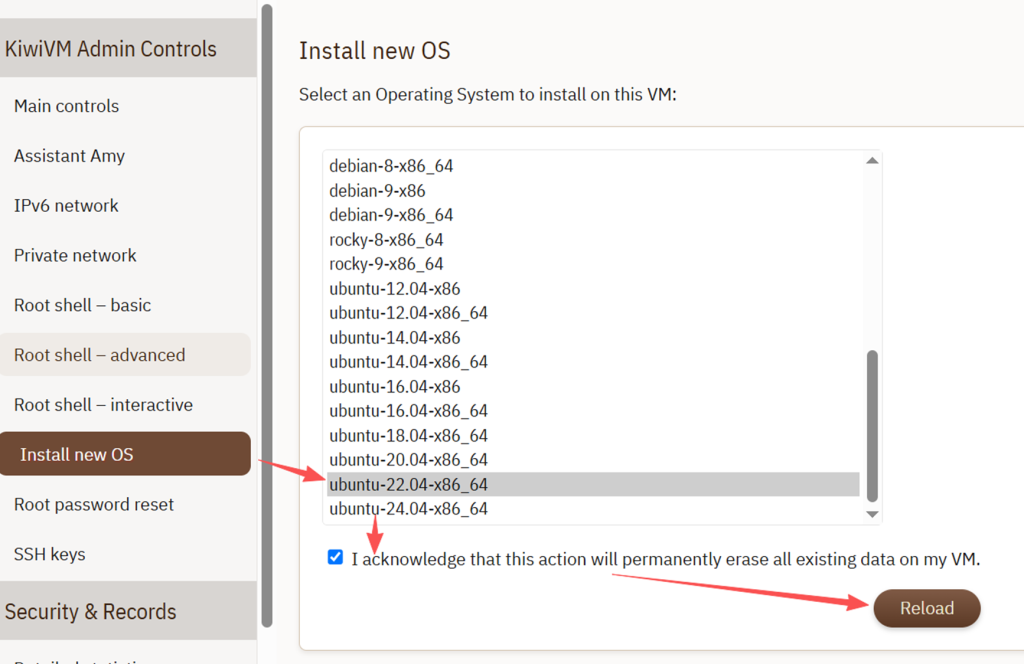
You will see a warning that all existing data will be erased. Confirm to continue:
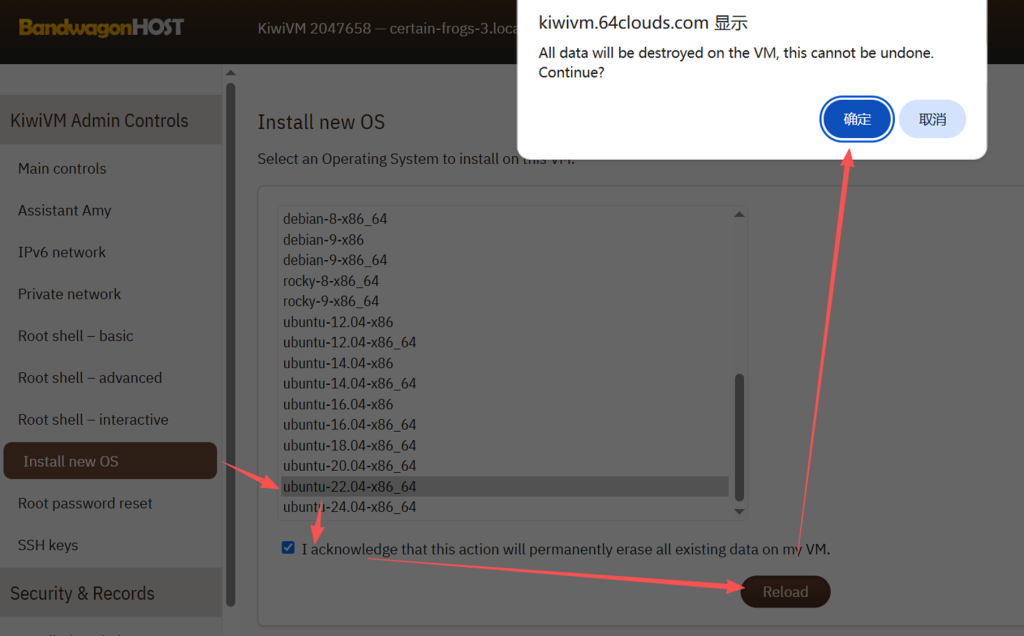
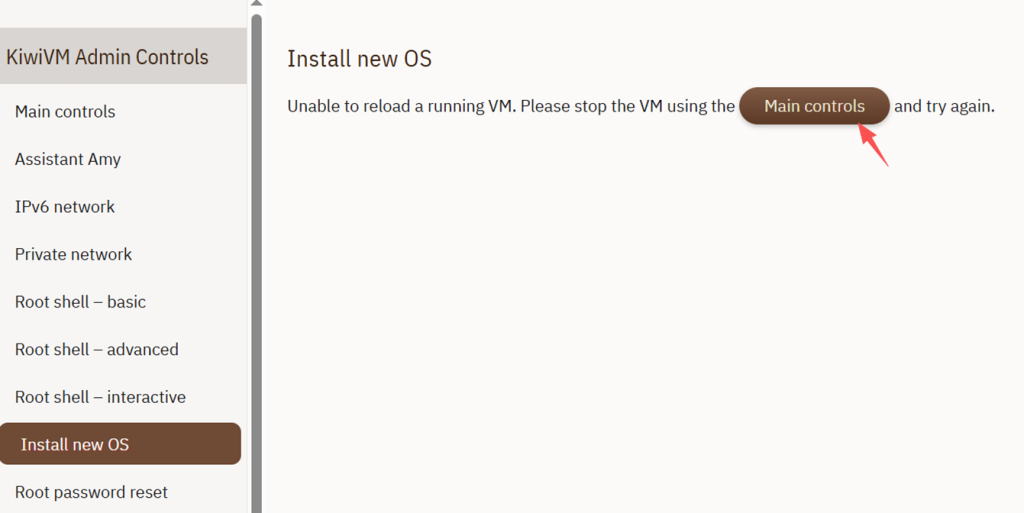
If the system prompts that the VPS must be powered off first, click “Main controls” to return to the control panel:
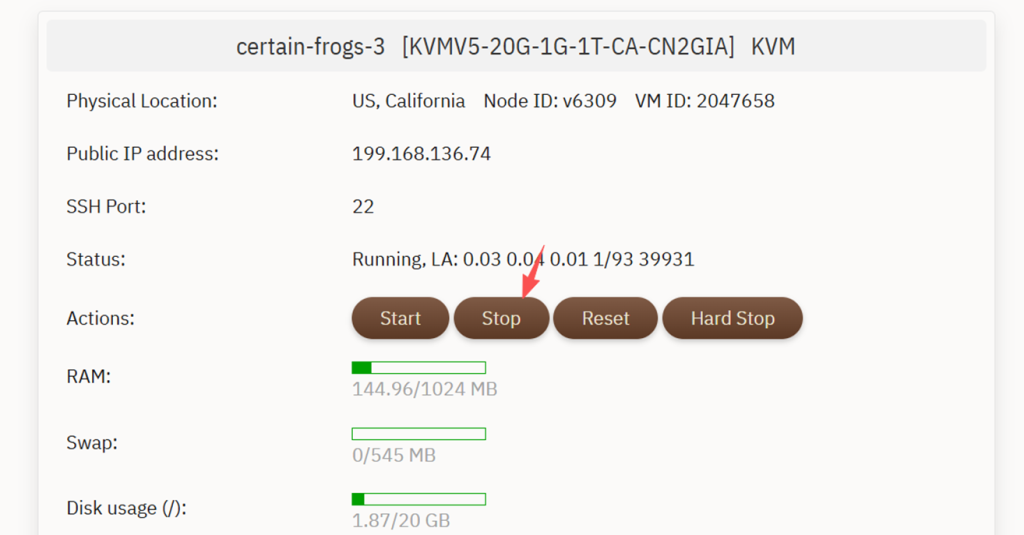
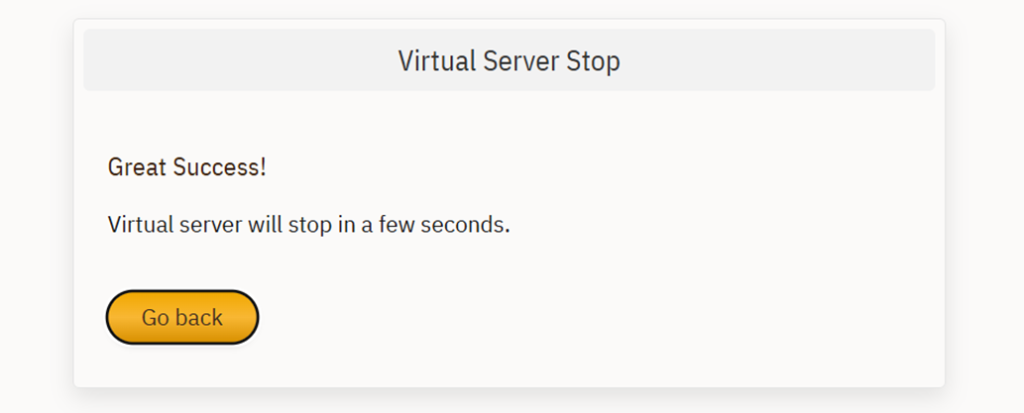
Click the “Stop” button to shut down the VPS:
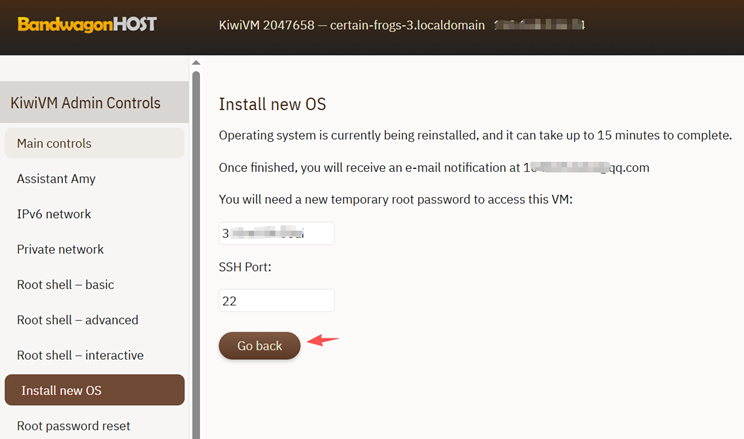
After installation finishes, click “Go back” to retrieve the new system credentials, including the root password and SSH port:
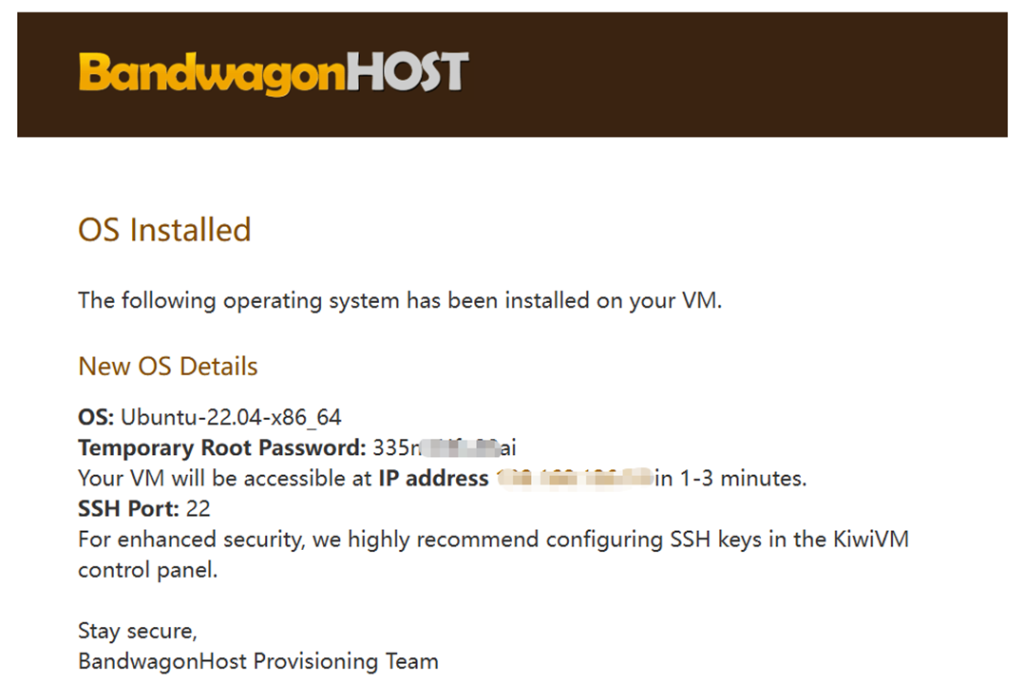
You will also receive an email from BandwagonHost containing the system reinstallation details:
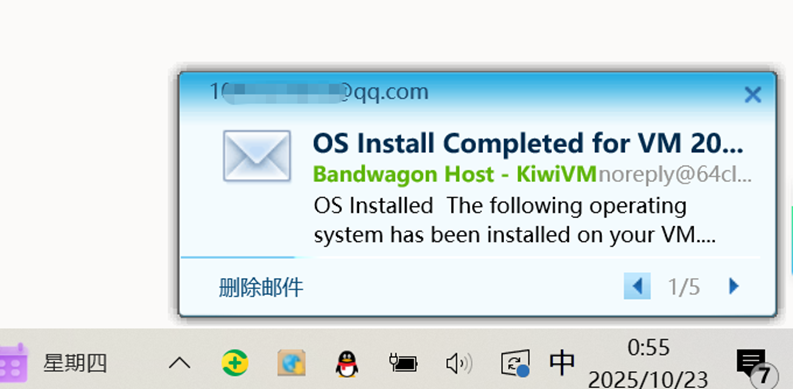
The email will include your VPS system information and SSH credentials:
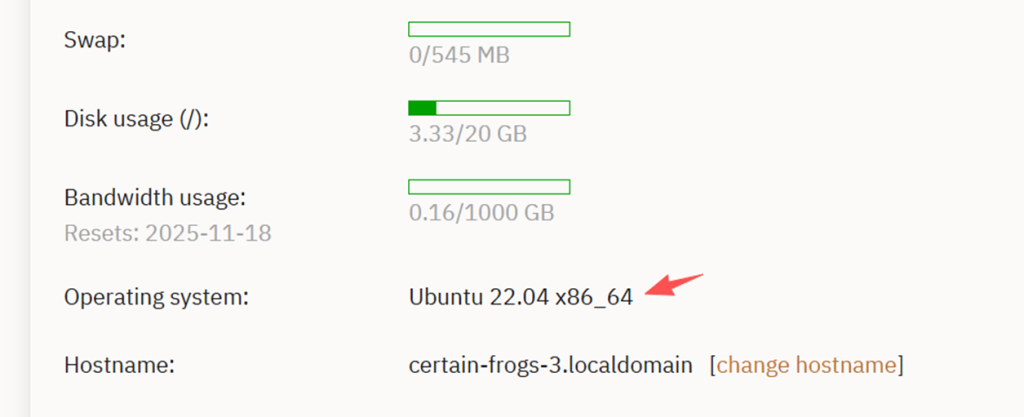
Back in the VPS control panel, you can confirm that the operating system is now Ubuntu 22.04 x86_64:
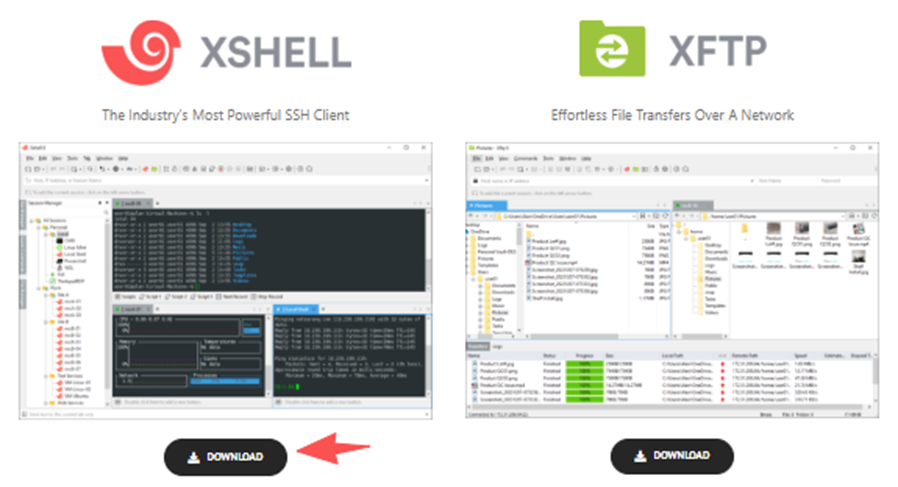
Use an SSH client such as Xshell or Termius to connect to your VPS. This tutorial uses Xshell as an example.
Download Xshell from:
[https://www.xshell.com/en/free-for-home-school/](https://www.xshell.com/en/free-for-home-school/)
After installation, open Xshell, enter your VPS IP address and SSH port (default 22), then click “Connect.” Enter the username “root,” input the password, and accept the SSH key prompt:
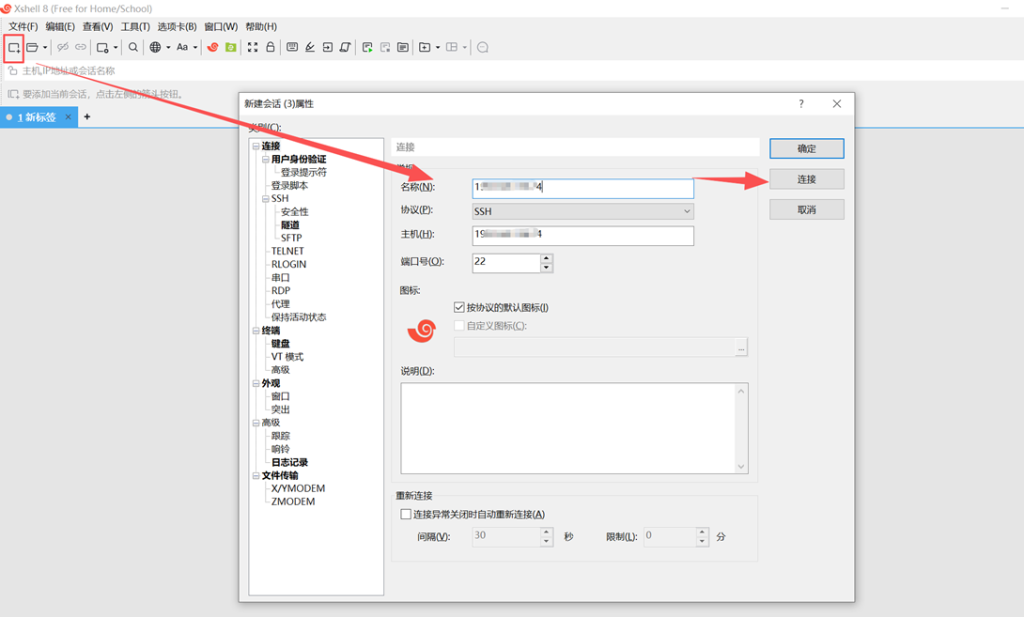
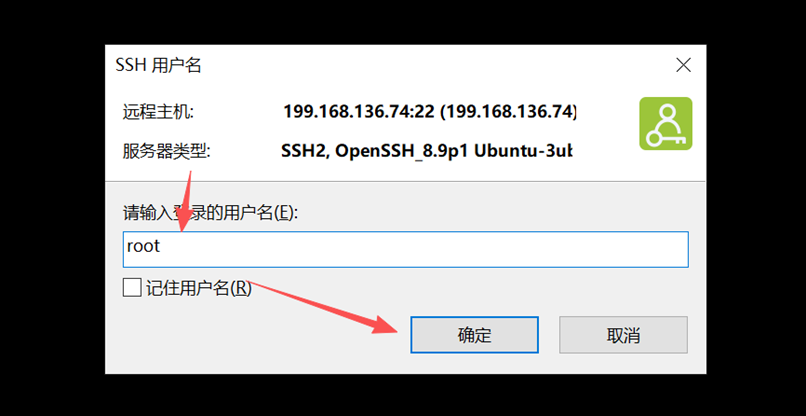
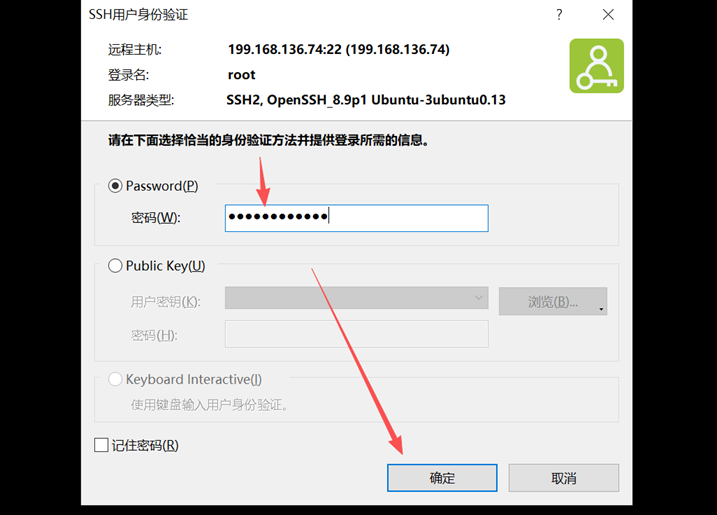
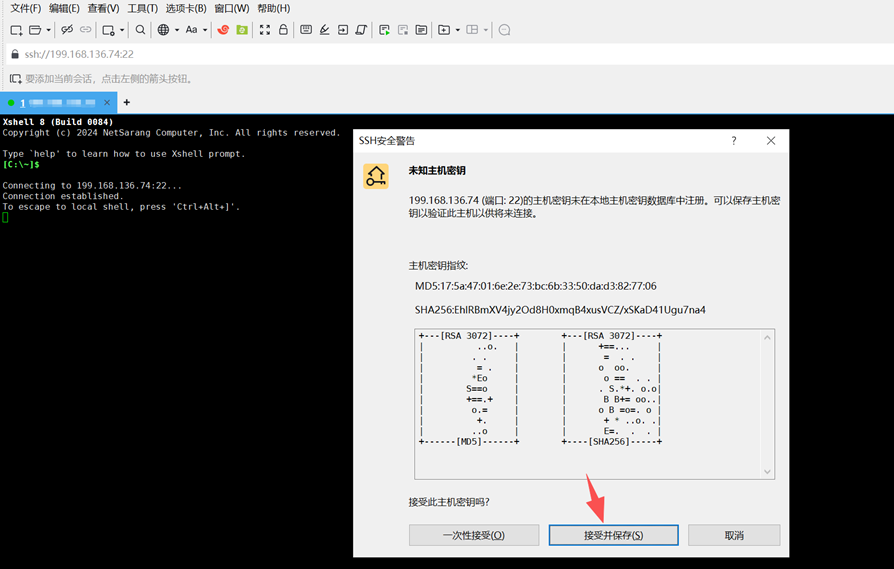
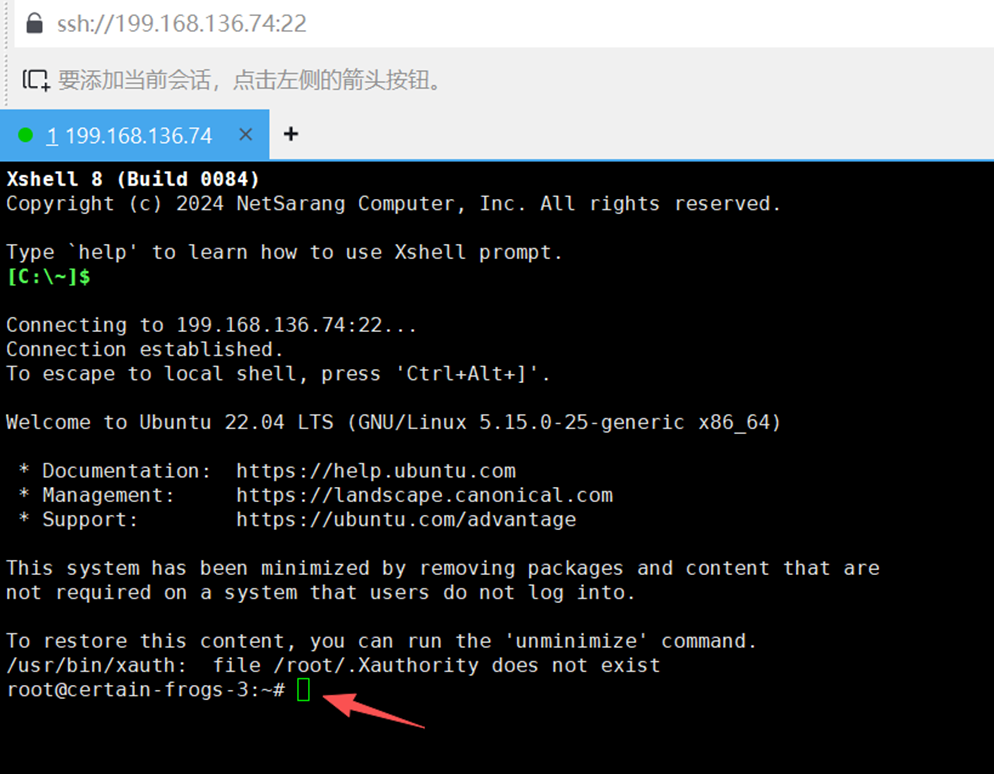
Once connected successfully, your SSH terminal should look similar to the image below:
III. Install aaPanel (Linux Version) with One Click
aaPanel is one of the most popular visual server management panels in China. It supports one-click deployment of websites, databases, SSL certificates, and more, making it ideal for beginners.
In the SSH terminal, run the following installation script. You can also visit the official aaPanel installation page:
[https://www.bt.cn/new/download.html](https://www.bt.cn/new/download.html)
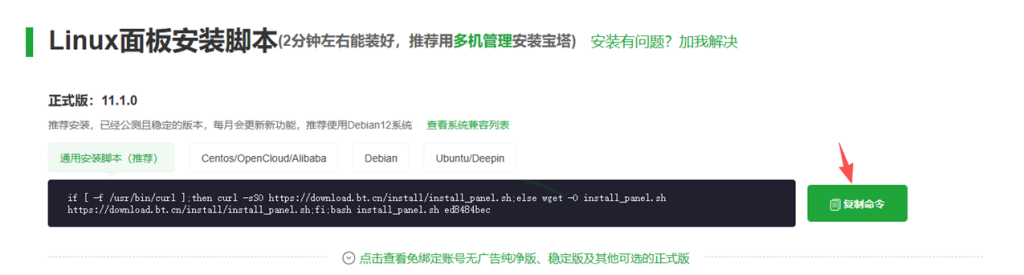
Installation command:
if [ -f /usr/bin/curl ];then curl -sSO https://download.bt.cn/install/install_panel.sh;else wget -O install_panel.sh https://download.bt.cn/install/install_panel.sh;fi;bash install_panel.sh ed8484bec
During installation, type “y” to continue:

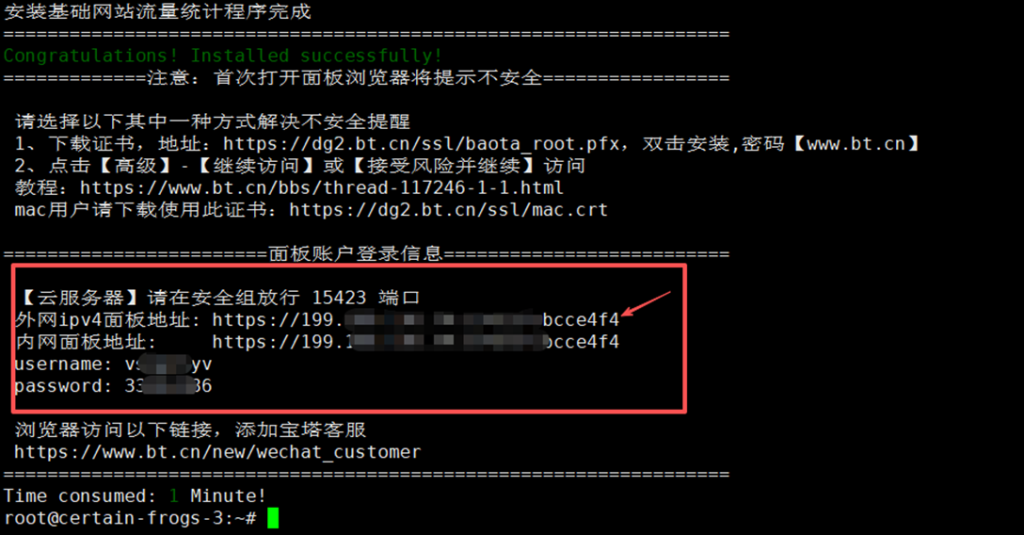
After installation completes, aaPanel will display the panel URL, username, and password, for example:
Panel URL: http://yourIP:8888/abcdef
Username: admin
Password: xxxxxx
Example screenshot:
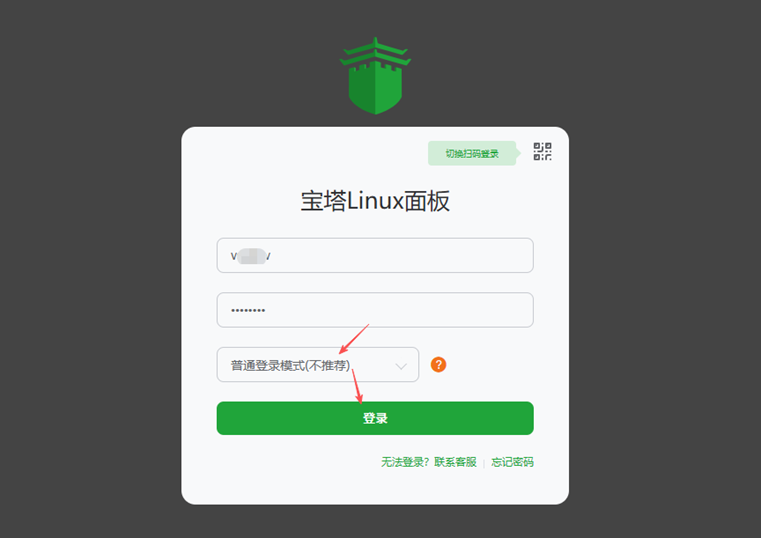
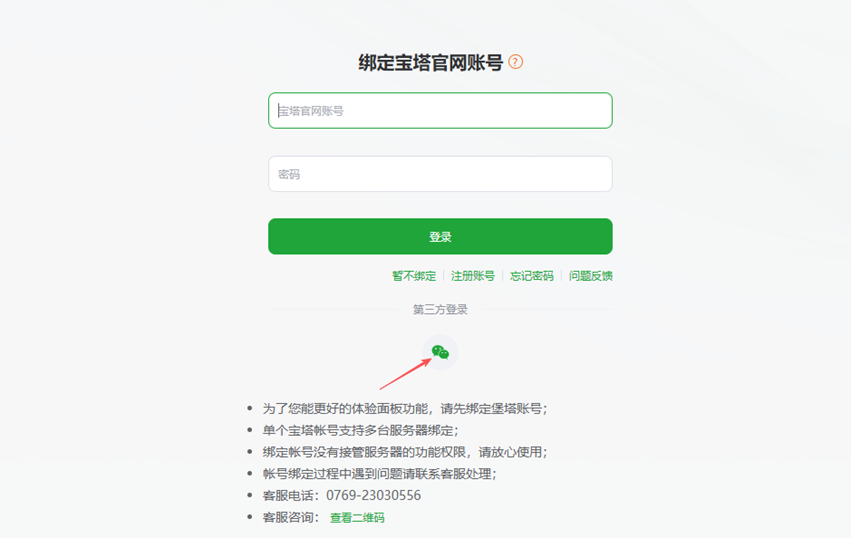
Open the panel URL in your browser to access the aaPanel dashboard:
IV. Configure the Server Environment (One-Click LNMP Installation)
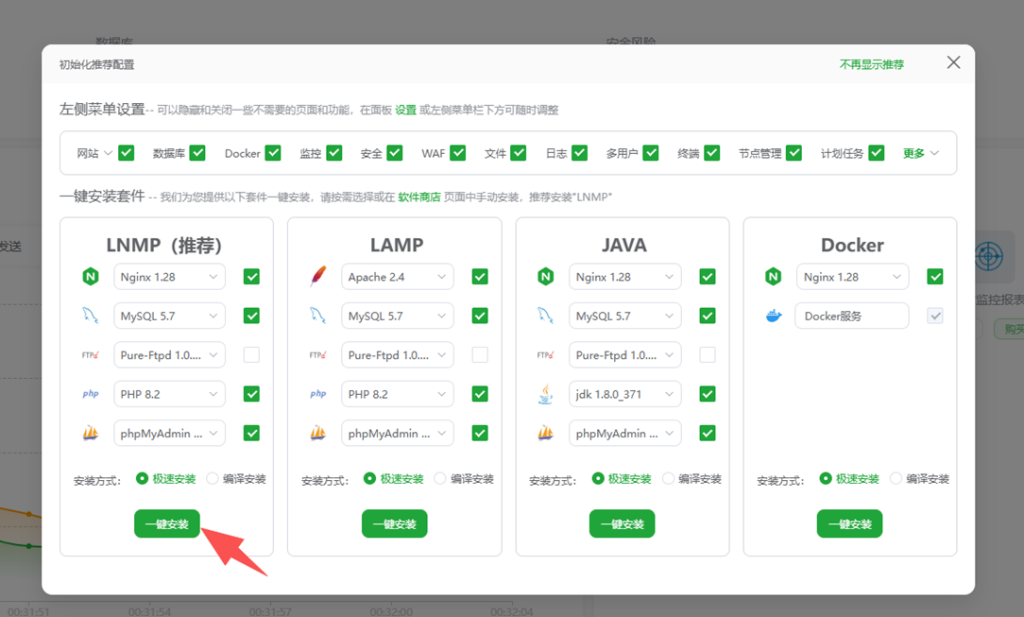
After logging into aaPanel for the first time, you will be prompted to install the runtime environment. It is recommended to choose the LNMP stack (Nginx + MySQL + PHP).
Recommended versions:
- Nginx 1.22+
- MySQL 5.7 or 8.0
- PHP 8.1+
- Pure-FTPd (Optional)
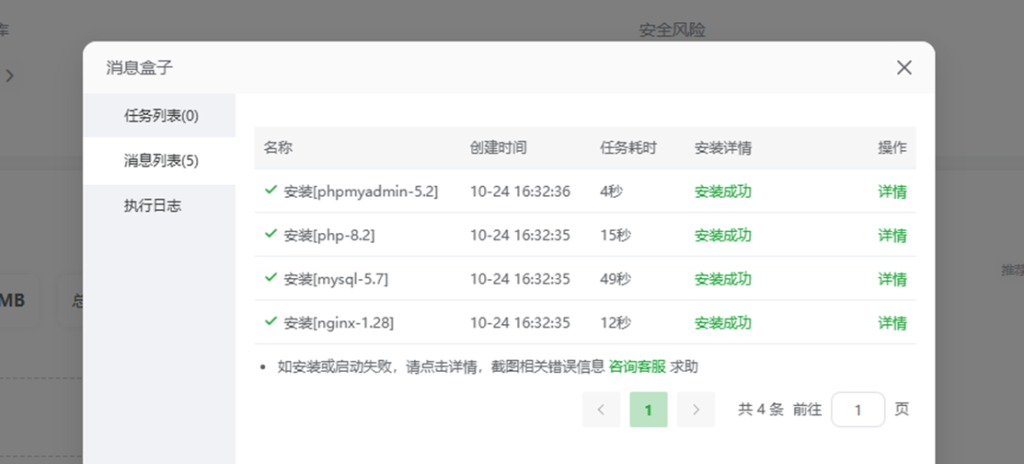
Click “One-Click Install” and wait several minutes for the environment to finish deploying automatically:
V. Create a Website and Bind Your Domain
- Open the left menu → “Websites” → “Add Site”
- Enter your domain name (e.g. example.com)
- Select PHP 8.1 as the PHP version
- Enable database creation (the system will automatically generate a username and password)
- Click “Submit”
Your website root directory will be created automatically under:
/www/wwwroot/yourdomain/
VI. Install WordPress with One Click
- Open your newly created website → “Root Directory” → “Upload”
- Upload the latest WordPress package:
https://cn.wordpress.org/download/ - Extract the archive and delete the ZIP file
- Open your domain in the browser, for example:
http://example.com
- Follow the WordPress installation wizard:
- Database Name: generated by aaPanel
- Username: database username
- Password: database password
- Database Host: localhost
Afterward, create your administrator account (e.g. admin), then click “Install WordPress.”
Nowadays, aaPanel also includes a built-in one-click deployment template for WordPress, which is even simpler.
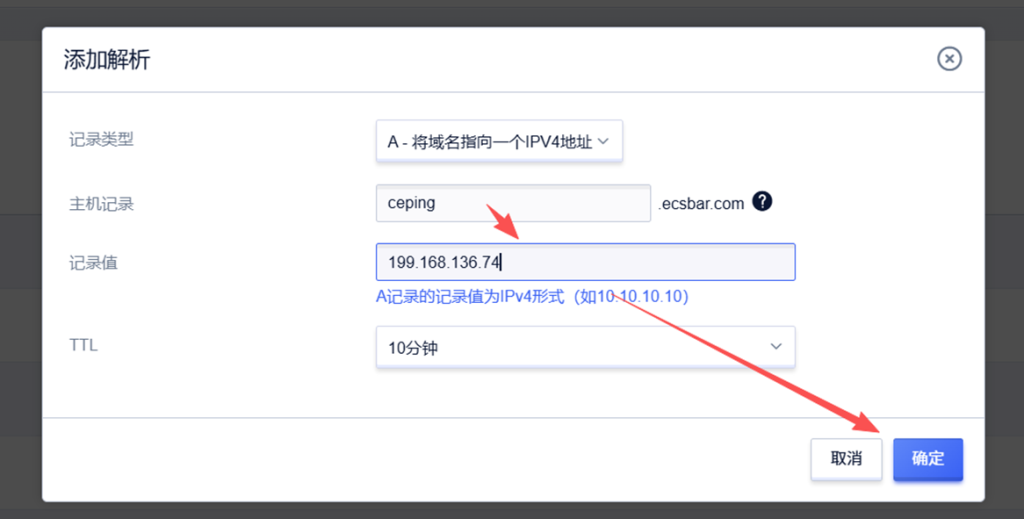
Before creating the website, make sure your domain is pointed to the VPS IP address. In this example, the domain is managed on UCloud:
[https://console.ucloud.cn/udnr/manage](https://console.ucloud.cn/udnr/manage)
A subdomain has been pointed to the BandwagonHost VPS IP:
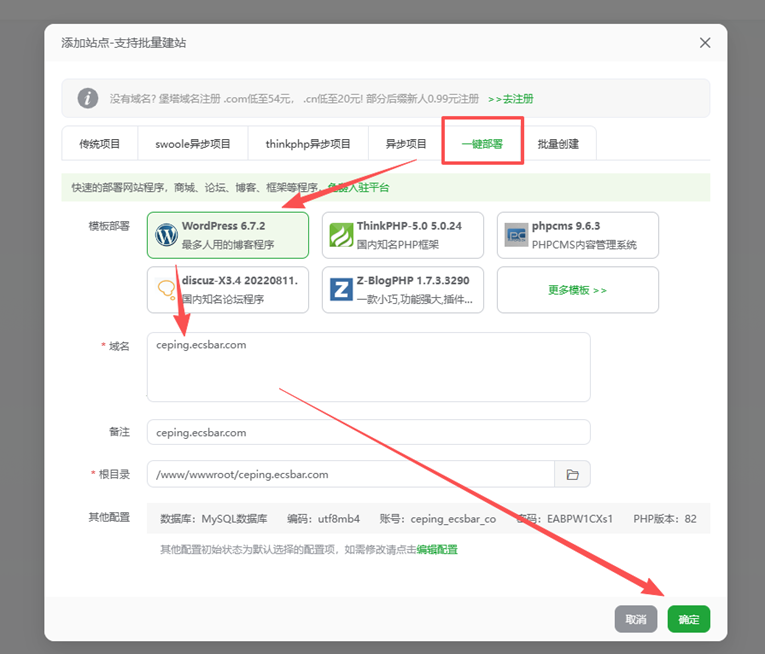
Return to aaPanel and follow the previous “Add Site” steps. This time, switch from “Traditional Project” to “One-Click Deployment,” select WordPress, enter your domain, then click “Confirm”:
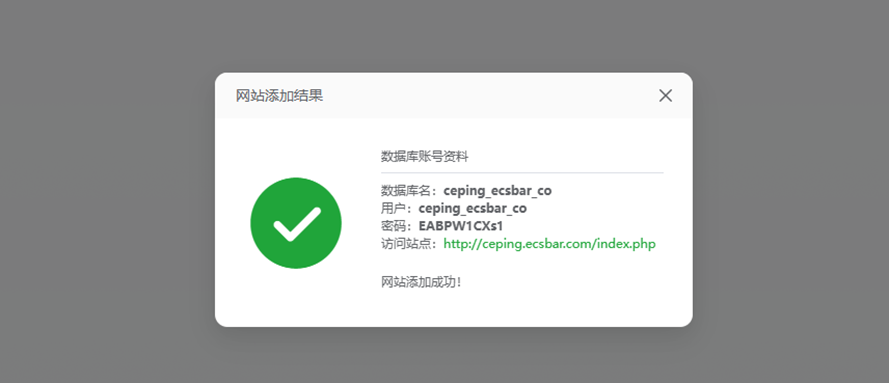
Save the database information shown in the popup window, as it will be required later:
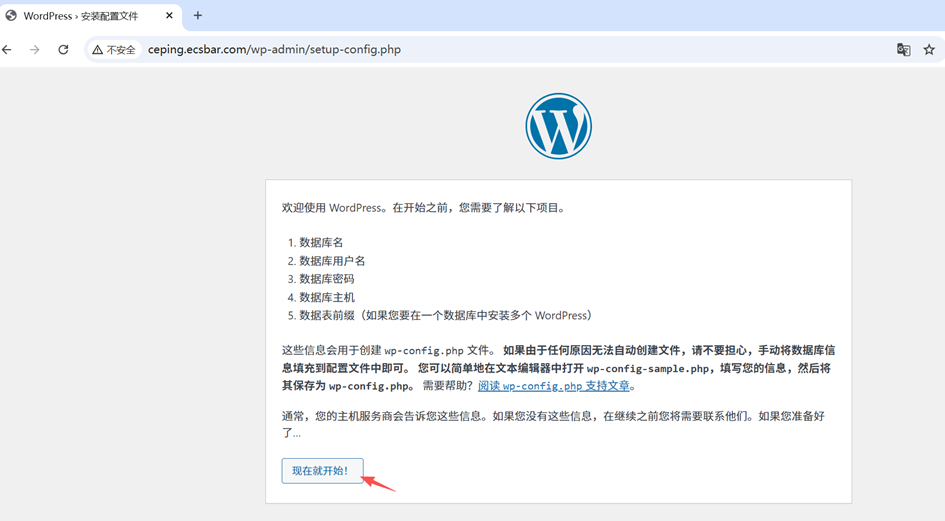
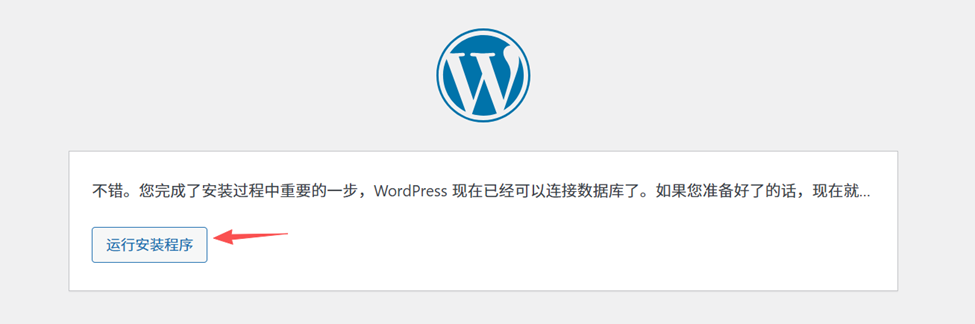
Visit the website and click “Let’s Go”:
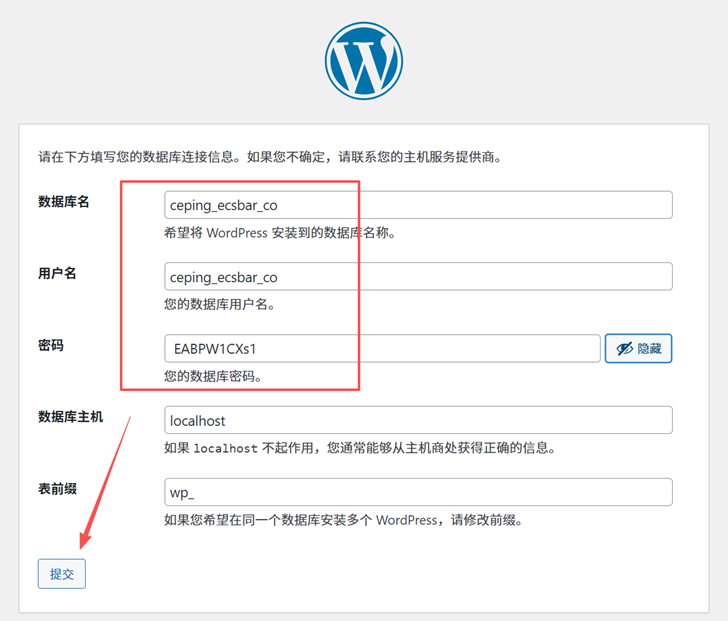
Enter the database name, username, and password copied earlier, then continue with the installation:
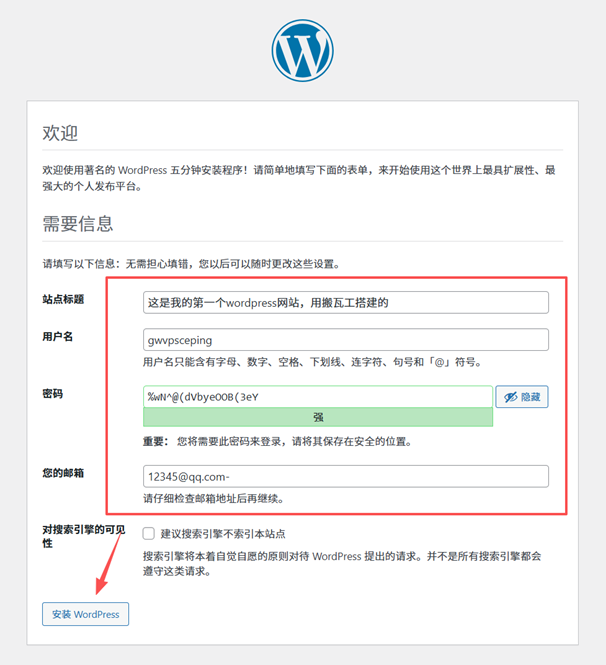
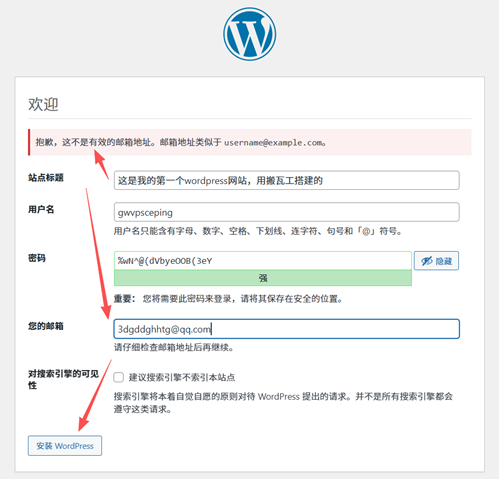
Set your website title, admin username, password, and email address, then click “Install WordPress”:
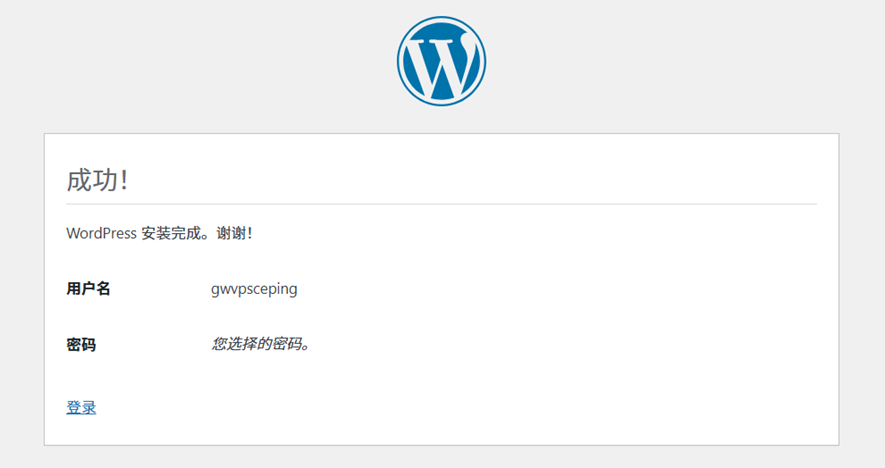
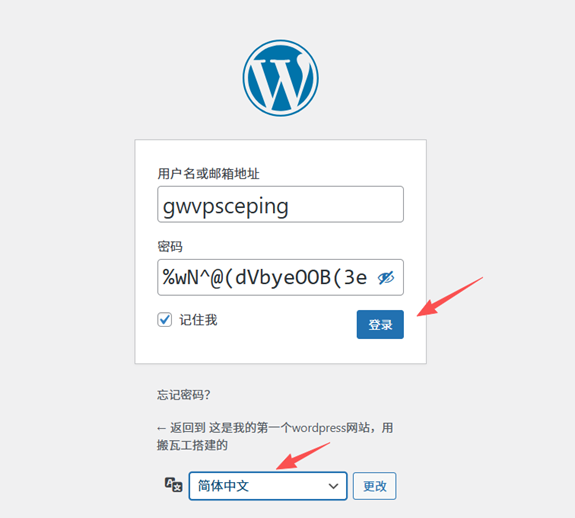
Once installation is complete, click “Log In” to access the WordPress admin dashboard:
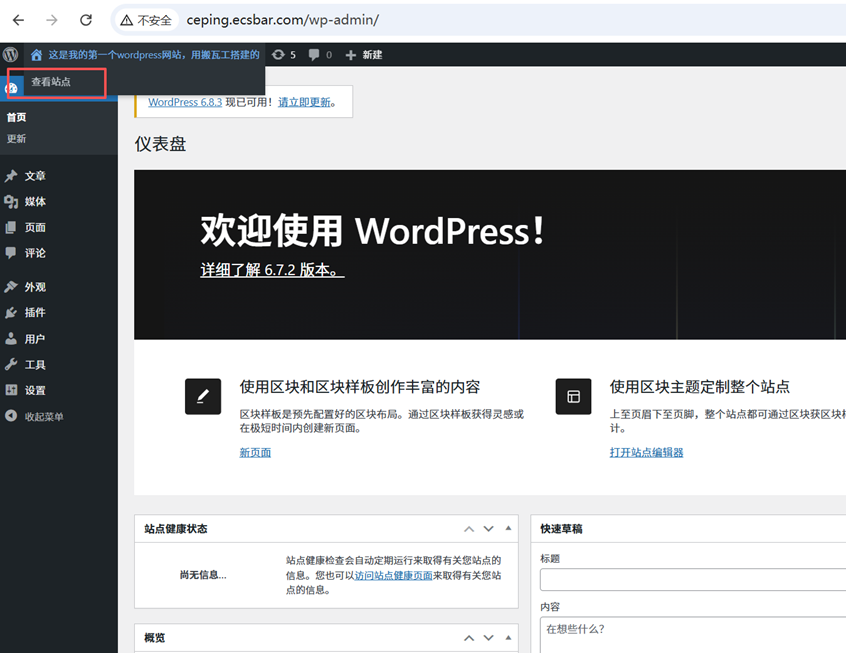
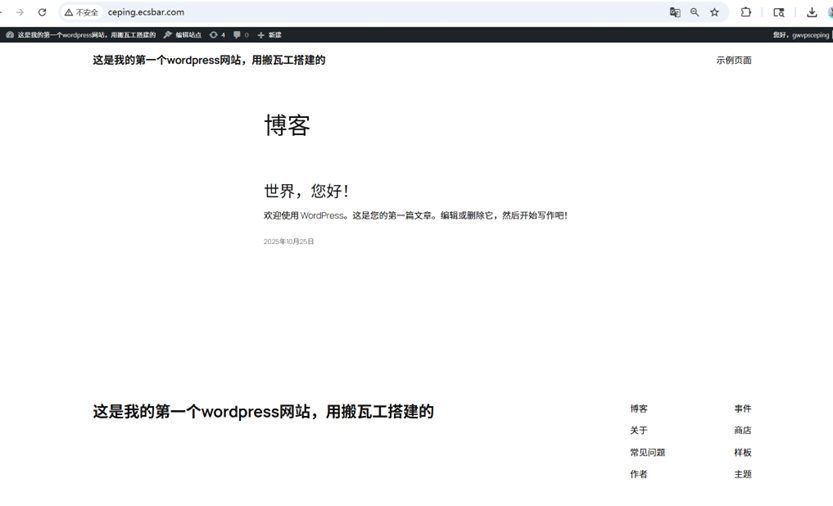
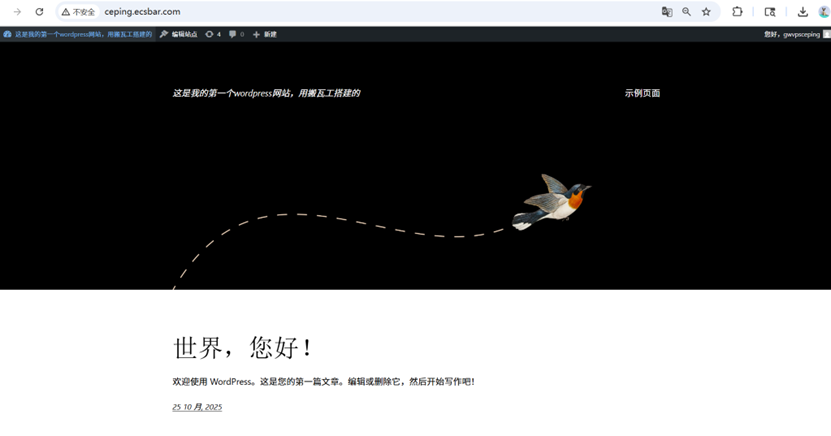
You are now inside the WordPress admin dashboard. To preview the frontend website, click “Visit Site” in the top-right corner:
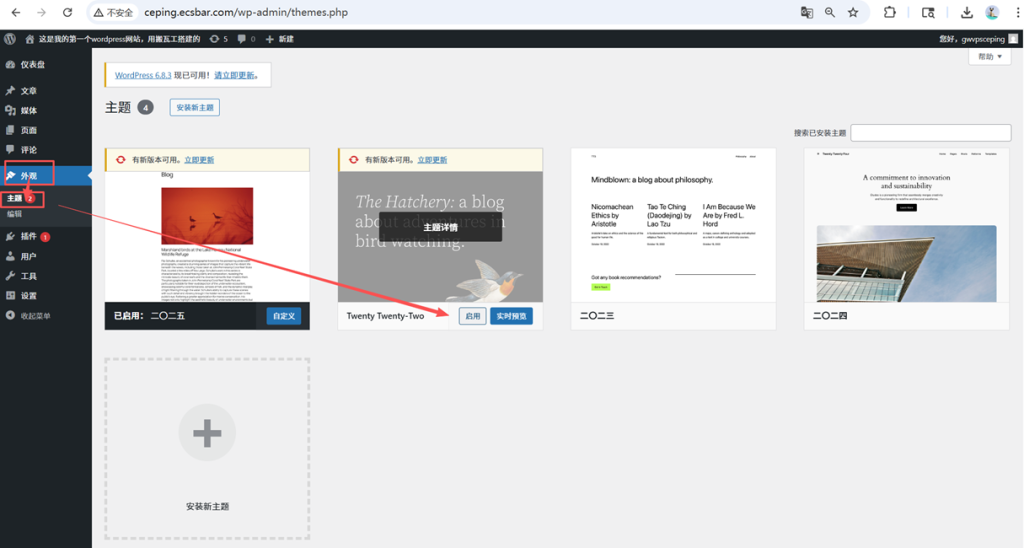
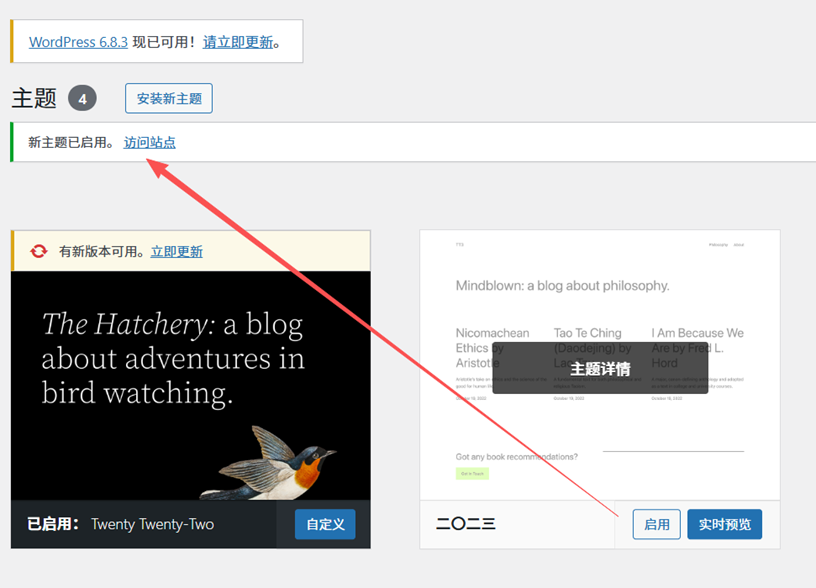
Go back to the WordPress dashboard → “Appearance” → “Themes.” You can install your preferred WordPress theme or activate one of the default themes:
VII. Configure an SSL Certificate (Enable HTTPS)
After your website is installed, enabling HTTPS is highly recommended for both security and SEO.
In aaPanel, open:
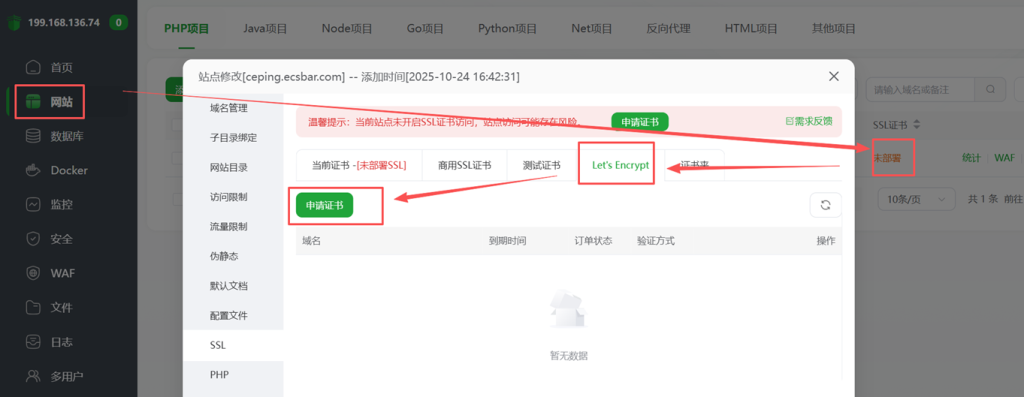
“Websites” → “Settings” → “SSL”
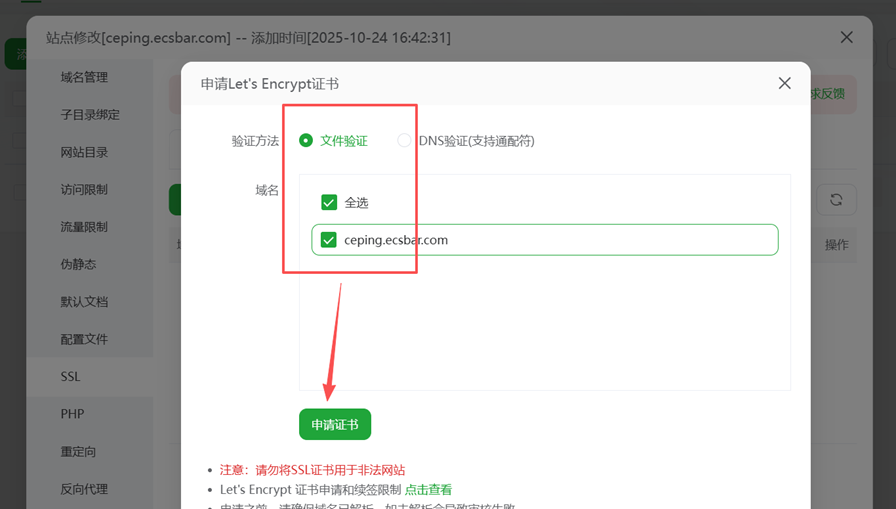
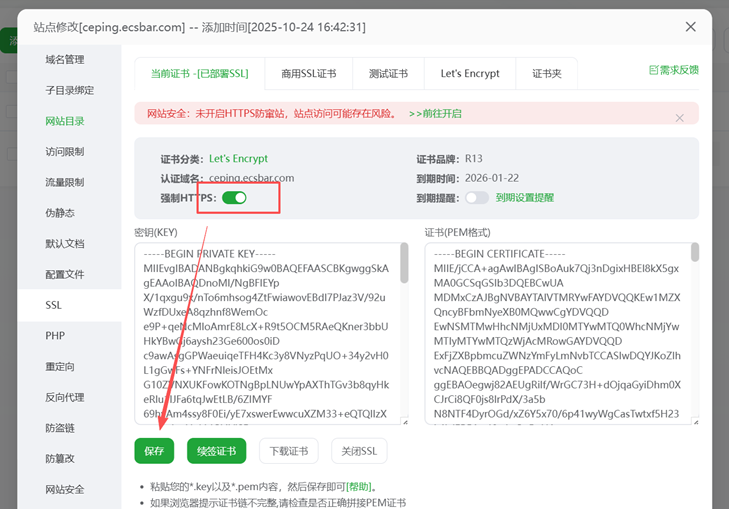
Choose “Apply for Free Certificate (Let’s Encrypt),” select your domain, then click “Apply.”
After the certificate is issued successfully, enable “Force HTTPS” to secure all website traffic:
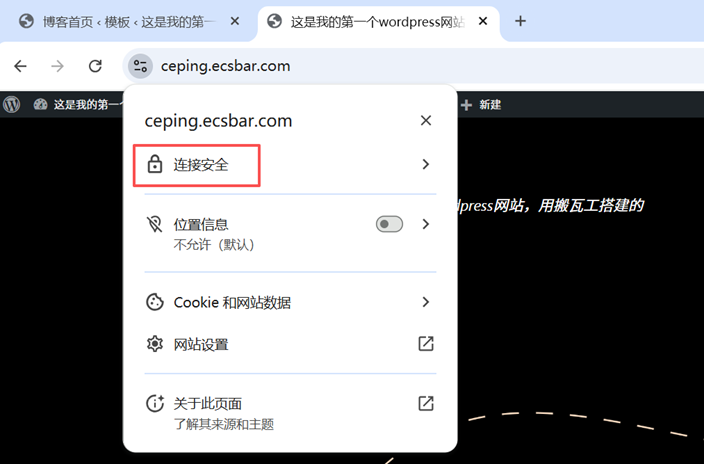
Visit your website again, and you should now see the SSL certificate successfully enabled:
VIII. Optimization & Security Recommendations
-
- Regularly Back Up Your Website and Database
aaPanel supports automatic backups to local storage or third-party platforms such as Alibaba Cloud OSS and Google Drive.
- Regularly Back Up Your Website and Database
“`
-
- Close Unnecessary Ports
“`In aaPanel’s “Security” section, keep only ports 22, 80, and 443 open.
- Close Unnecessary Ports
“`
-
- Enable the Firewall
“`aaPanel includes a built-in firewall that can help defend against brute-force login attempts and simple DDoS attacks.
- Enable the Firewall
“`
- Install WordPress Security Plugins
“`Recommended plugins: Wordfence, Limit Login Attempts Reloaded, and UpdraftPlus.
IX. Frequently Asked Questions (FAQ)
Q1: Why can’t I access port 8888 after installing aaPanel on my BandwagonHost VPS?
A1: Log in to the KiwiVM control panel and verify that port 8888 is allowed in the firewall. Alternatively, run the following commands via SSH:
iptables -I INPUT -p tcp --dport 8888 -j ACCEPT
service iptables save
Q2: Why is the WordPress admin dashboard slow?
A2: Enable Nginx caching, install the LiteSpeed Cache plugin, or migrate to a datacenter closer to your visitors.
Q3: How do I bind multiple domains?
A3: In aaPanel, go to “Website Settings” → “Domain Management” and add additional domains. Multiple domains can point to the same WordPress installation.
X. Conclusion
By following this tutorial, you have learned how to deploy a WordPress website on a BandwagonHost VPS using aaPanel with just a few clicks. The entire process — from operating system installation and server environment setup to HTTPS encryption — can be completed through a graphical interface without requiring Linux command-line experience.
If you plan to build a personal blog, an international business website, or a product showcase site, this solution is both cost-effective and highly efficient.